Shopify QuickBooks integration can bring advantages to business owners and startup founders. By combining accounting software, you can enjoy more features that can automatically organize your information. With QuickBooks for Shopify, you can easily export all your Shopify sales data to QuickBooks Online with a single click. This mobile and cloud-based software is powerful yet easy to learn, freeing up your time to focus on growing your enterprise.

- What are the Benefits of Shopify QuickBooks Integration?
- What Are the Steps for Shopify QuickBooks Online Integration?
- Things to Consider Before Shopify Integration with QuickBooks Desktop
- What are the Steps for Shopify Integration with QuickBooks Desktop?
- Step 1: Process to Establish Your Tax Likes
- Step 2: Process to Create an Application Token
- Step 3: Process to QuickBooks Shopify Integration Connect Your Accounts and Initiate the Integration
- What is the Best App to integrate Shopify and QuickBooks?
- How to Export Data with QuickBooks POS Shopify Integration?
What are the Benefits of Shopify QuickBooks Integration?
QuickBooks Shopify integration saves time by automating data entry and provides accurate financial data. Here are the key benefits
- Import Shopify orders/refunds, with customers and products.
- Export historical data from Shopify to QuickBooks.
- Auto-export Shopify Payments fees/payouts to QuickBooks Online.
- Full summary of Shopify orders and total value in QuickBooks.
- Auto-import tax rates for multiple agencies and set up new ones.
- Choose an account to allocate product sales income/gift cards.
What Are the Steps for Shopify QuickBooks Online Integration?
Integrating your Shopify store with QuickBooks Online can be accomplished with just a few steps. Follow this guide for the process of how to perform your Shopify QuickBooks Online Integration
- Log in to QuickBooks Online.
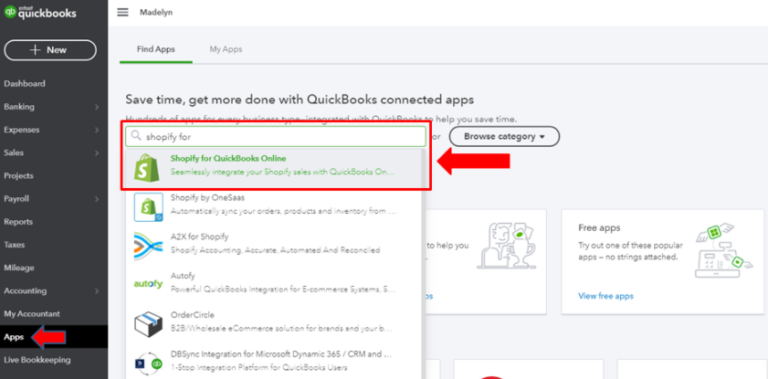
- Install the Shopify Connector app in the Apps section.
- Connect your QuickBooks and Shopify accounts by clicking Connect.

- Enter your Shopify store’s domain URL and connect to Shopify.
- Log in to your Shopify store to complete the integration process.
- QuickBooks Online and Shopify are now integrated.
Note: To add another connection, simply select the ‘Add Connection’ option.
Things to Consider Before Shopify Integration with QuickBooks Desktop
Before you begin with Shopify integration with QuickBooks you must consider the below points.
- Register a unique code for the subscription of your Shopify
- Download and install the latest QuickBooks desktop program.
- Install the desktop connector QuickBooks app in the admin panel of Shopify
- Initiate the integration process on a similar system.
- Complete the migration of point of sale QuickBooks data first.
- Online users can install the QuickBooks Online app on their store.
- Integration can only be done once and cannot be undone. Contact support to reset.
What are the Steps for Shopify Integration with QuickBooks Desktop?
Follow the steps below to integrate Shopify with QuickBooks Desktop:
Step 1: Process to Establish Your Tax Likes
To begin the Shopify QuickBooks integration process, it is important to first establish your tax liking within the QuickBooks Desktop program.
- Launch the QuickBooks Desktop application from your computer.
- Tap Edit and then liking or Preferences.
- Under the “If sales tax is charged” section, type “Yes.”
- Pick an existing sales tax product
- Pick the field that says the most common item related to sales tax, if the item is common
To create a new sales tax item, follow these steps:
- Pick to add a product with sales tax.
- Give your sales tax item a name in the “Sales Tax Naming” field.
- Enter “Sales Tax” in the “Define” field.
- Type zero in the Tax Rate field.
- Hit ok
- Finally, tap ok to confirm your changes.
Step 2: Process to Create an Application Token
Once you have configured your tax preferences, the next step is to create an application token within the QuickBooks Desktop software.
- Launch the QuickBooks Desktop application on your computer.
- Select File > App Management > Manage Web Apps.
- Type “Shoppinpal QBD connector” in the “Search Apps” field and initiate a search.
- tap “Set up” in the “Action” column.
- pick “Generate token.”
- pick “Copy to clipboard.”
Step 3: Process to QuickBooks Shopify Integration Connect Your Accounts and Initiate the Integration
To use desktop connector QuickBooks in Shopify, map your data fields with Shopify categories, add your app token and provide your API stock key.
- Navigate to Shopify Settings and choose the channel for sales
- Pick the connector for Desktop QuickBooks
- Click “the open application tab and “Initiate integration.”
- Generate and enter a token for the app and map QuickBooks fields to Shopify categories.
- type key for the Stocky API
- Click “Begin Integration” to initiate the process.
What is the Best App to integrate Shopify and QuickBooks?
The best app to integrate QuickBooks and Shopify for better business functioning, the connector relating to Shopify has been introduced. it links your store data with that of the QuickBooks program.
- Let us start by initiating the program used for accounting.
- Look for the feature that says search
- there you need to type Connector for Shopify
- Pick this app for integration and tap on where it says to get the app.
- Download it.
- Enter the requested information into the app once you have completed the download.
- Let QuickBooks Online integration with Shopify complete its process.
How to Export Data with QuickBooks POS Shopify Integration?
QuickBooks POS will be available for reference only after October 3, 2023, as payment acceptance will no longer be possible. No account cancellations are necessary when switching to Shopify, but it is recommended to avoid processing sales through QuickBooks POS to prevent inventory and reporting errors.
QuickBooks POS Shopify Integration will allow you to export all your data from the desktop application. The process is as follows:
- Launch the QuickBooks Desktop Point of Sale application on your desktop device.
- Go to the Export option by clicking on File then Utilities then Export.
- Pick the specific data file that you wish to export, and click on “Next.”
- Browse and select the destination folder where you would like to save the data file.
- Pick sheet 1 In the “write or enter records to” box
- Click on “Manage Templates,” then select “Select pr pick all,” and finally hit “Save.”
- Proceed by clicking on “Next” and then “Export.”
Shopify QuickBooks integration is not obligatory for businesses, but it can be advantageous. By integrating the two platforms, businesses can access all features from one space, which can help in long-term growth.
Frequently Asked Questions
Yes, You can integrate Shopify with QuickBooks.
To integrate Shopify with QuickBooks, you can use the Shopify app in the QuickBooks App Center, which will walk you through the process.
Yes, a little experience would help.
You can sync a variety of data, including orders, refunds, taxes, products, customers, and payments.
Yes, You can choose which data to sync between Shopify and QuickBooks by selecting the appropriate options during the configuration process.
Yes, you can set up automatic syncing between Shopify and QuickBooks, so that data is updated in real-time.
The frequency of data syncing between Shopify and QuickBooks depends on your configuration settings. You can choose to sync data automatically in real-time or on a schedule, such as every hour or once a day.
After installing the Shopify app in QuickBooks, you can verify that it’s installed correctly by checking your Shopify website’s admin panel.
If there’s an error during data syncing, you’ll receive a notification in the QuickBooks app. You can also check the sync log to troubleshoot and resolve any issues.
Yes, during the configuration process, you can customize your integration settings to fit your business needs and accounting practices.
No, but it integrates with QuickBooks.

